Windows 11 Installation Guide: 5 Ways to Upgrade from Windows 10
How to's | GuidesSunday, 27 August 2023 at 22:12
Windows 11 has been out for a while, and is already quite different from the first iterations. However, not all users of Windows 10 users have promptly migrated to the newest update. If the latest Windows 11 builds have awaken your curiosity, than that may be the right time to update! Windows 11. If you don't know exactly where to start, we have provided this guide that will teach how to install Windows 11 through the most conventional and practical ways.
5 Ways to Install Windows 11
Windows 11 offer some benefits over Windows 10 and also improves the UI that started with the latest iteration. We have an improved notification center, the return of widgets, support for Android apps and much more.

Right now, there are five ways to download and install Windows 11. If you're on Windows 10 you may be prompted with a notification calling you to install Windows 11. It's a free update for supported Windows 10 computers. It's possible to install Windows 11 via the Windows Update, but you can also force it through the Installation Assistant or the Windows Insider Program. The fourth method includes a software tool that allows you to install a ISO file with the media creation tool. And finally, we can use an alternative software to make a installable media that will support computers that shouldn't support Windows 11 in a natural way.

How to Install Windows 11 via the Windows Update
The first method involves the native Windows Update method. It can be quite intuitive for some users because Windows will send notifications when there is one update available. You can follow some instructions to proceed with the installation. It is worth noting that you won't lose data or files on your PC with this option. In any case, we will help you how to proceed through this method.
- Head Over to Settings >> Update & Security. From there, go to the option "Check For Updates".
- For some users there will be a prompt with "Upgrade to Windows 11 is ready, and it's free. Click the Blue Download and Install Button and Agree to the terms with the Accept and Install button.
- You will see the Upgrade to Windows 11 under the Windows Update, with a percentage and download status. Wait until it's complete.
- Once the Download is Done, you will get a prompt to restart you PC. It will show up in a blue box. Choose the Restart Now option. The PC will proceed with the installation and will restart a few times. When finished, you will be taken to the desktop.
It's a seamless install, however, it's only valid if your PC meet the requirements for the OS.
How to Install Windows 11 via the Installation Assistant
If Windows 11 does not appear in Windows Update, you can go for the Windows 11 Installation Assistant. This will manually upgrade you from Windows 10 to the new OS. Again, using this method, will need you to make sure your PC meets Microsoft's minimum specs for Windows 11. The update is safe and will not delete your files.
- Visit Microsoft's Windows 11 download website. Look at the top for the Windows 11 Installation Assistant option and click the Blue Download Now Button.
- Wait for the tool to Download. When it is complete, launch it. Click Yes when prompted.
- In the pop-up box, you need to go for the Accept and Install. It will be a simple process from them. The assistant will download Windows 11, and after that will verify the integrity of the download.
- Finally, you'll get a prompt about Windows 11 installing in the background. Depending on hour hardware, it could take a while.
- Once the initial install is complete, click the Restart Now Button. You'll be prompted that you are about to be signed out. Wait while your PC restarts and installs Windows 11. It could take up to 30 minutes or an hour based on the speed and age of your PC and your CPU.
- While Windows 11 is installing, you'll see Working on updates on your screen. A percentage will indicate the progress, your PC will restart a few times. Be patient and wait for the completion.
How To Install via Windows Insider Program
This method is an alternative when none of the above works for you. It should be a last resort, as the Insider Program is not exactly for newcomers.
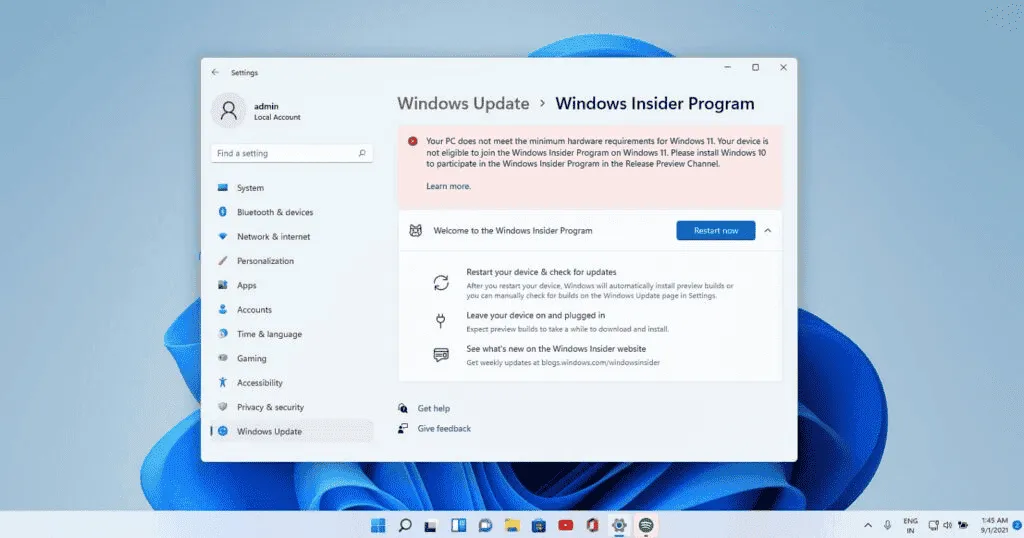
It will often install updates that are on th Beta and Dev channel, these may contain bugs. If you're ready for any adventure than please proceed with the steps below:
- Open Settings >> Update & Security >> Windows Insider Program. Then, link your Microsoft Account.
- The beta channel is quite stable for those testing the OS. If you go for this channel, you won't experience many bugs and issues. However, the releases happen after a certain amount of weeks. The Dev Preview Channels gets new features and is updated on a weekly basis. Keep in mind, however, that the Dev channel is more due to contain bugs.
- Select your Channel, and confirm your Choice. You'll be prompted to sign in with a Microsoft Account, if you weren't already. Your PC will restart after that.
- Once your PC restarts, head to Head over to Settings > Update & Security. From there, check again for updates. You will see Windows 11. Choose Download and Install and Wait While the OS installs on your device!
How to Perform a Clean Install of Windows 11 with the Media Creator
If you want to make a build straight from scratch, then the Windows Media Creator for Windows 11 should be a option. This allows you to create a bootable USB drive that you can use to clean install Windows 11 on your current Windows 10 PC or on another device. Doing so will remove all of your files. You can head to the Windows 11 Download page. From there, choose the Create Windows 11 Installation Media Option.
- Agree to the terms and choose Accept. Let the Setup tool run, and choose Use the recommended options for this PC. Click Next, and choose USB Flash Drive.
- Choose your USB Flash Drive from the List and Click Next. You will be prompted and Windows 11 will start to be downloaded. Ocne finished, the installer will switch to Creating Windows 11 Installation Media. Once finished, you'll get a prompt that the drive is ready.
- Restart your PC and Boot from the Pendrive.
- From there you can proceed with the Installation. Accept the terms, pick the Disc Drive you wish to install Windows 11 and proceed. From the partition select screen you can also manage the partitions, delete existing ones, format and etc.
- Once you're done, proceed with the install and the installer will do the rest.
- The computer may reboot a couple of times.
- In the final steps you'll be prompted with an Welcome screen for final adjustments.
- From there you can set up your Microsoft account, and tweak the OS a bit.
Clean Install Windows 11 ISO file manually - Even on Unsupported PCs
The final step is the most extreme one as it is not an official method. At the same time, it allows you to tweak the installation and install Windows 11 on a PC that does not meet Microsoft's requirements. Just keep in mind that unsupported PCs will be detected and should be out of important updates.

- Visit the Windows 11 Download Page, and choose the Download The Disk Image. Choose multi-edition ISO from the list, and then the blue Download button. Select the Language based on the one you wish to install Windows 11. In any case, you can change the language after the installation is done.
- Once the file is downloaded, you will need to download a 3rd party app to clean install. One of the best alternatives is Rufus, it's a complete software that allows you to create a bootable Windows Installation Drive. The app also allows you to tweak the ISO allowing it to recognize unsupported PCs. It can also tweak it to allow the set up with a local account rather than a Microsoft's mail.
- Download Rufus from the website, Run the File and Select Yes. Then, under where it says device, Plug in an empty USB drive with more than 8 GB and choose it.
- Under Boot selection, choose Disk or ISO image. Then, click the Select button. Navigate to where you saved the ISO file and click Open.
- Choose Standard Windows Installation, or Extended Installation if your PC meets the specs. If it doesn't, the extended option allows you to bypass Microsoft's restrictions. Leave everything else as is, and then click the Start button to create the drive.
- Once the bootable pendrive is ready, you can refer to the previous method for the remaining details.
Conclusion
As you can see, installing Windows 11 is not a challenging task. These tips can be helpful if you're wishing to upgrade your Windows 10 machine to Windows 11, and also are good for those who are there just for the fun and to experiment Microsoft's ongoing OS.
Popular News


Latest News
Loading