Nowadays we live in an interconnected world where social media networks and apps greatly reduce the distance between people. However, with the continuous advancement of computing, we now live in a world where everything can be connected and accessed through virtual ways. With most of our data stored in smartphones and computers, we can be in serious trouble if a malicious individual gets access to it. Therefore, companies are constantly evolving the security of their products and software in a bid to keep users and their data safe. To keep your files safe, you can try to password-protect folders, and in this article, you’ll learn how.
Passwords to protect access to computers aren’t something new. While this was optional in some older versions of the most popular Operating Systems, Nowadays is almost mandatory to keep your Computer password protected. Therefore, only people with your password can access the device. However, there are some ways to make your files even more private. You can password-protect folders and keep them safe. You can let others use your computer without worrying about your files being accessed. Whether it’s sensitive banking info, or embarrassing files you’ve stored, it’s pretty much possible to keep your files password protected. This article will teach you how to password-protect your files and keep them away from prying eyes. In this article, you will learn how to do so on Windows, www.gizchina.com/2024/01/31/how-to-stop-your-mac-from-freezing-7-practical-tips/, and Linux computers running the Ubuntu distribution. (via DigitalTrends).
How to Password Protect Folders and files on Windows, Mac, and Ubuntu
Not all iterations of Operating Systems come with the ability to directly password-protect your files. However, while the feature is not available, it is still possible to make them password-protected. Follow the steps below and learn how to password-protect your files natively or using third-party apps on Windows, Mac, and Ubuntu.
Windows 10 and Windows 11 Pro – Enabling Folder Encryption
If you’re running Windows 10 or Windows 11 Pro, they come with a built-in protection system. It’s not the most fully featured folder protection, but can do the job for most users. Windows’ standard encryption offers file obfuscation that locks a file to your account. That way, if someone on another account or someone who copied your files away to another PC tried to access your content, they’d need to know your account password.

Anyone using your PC and account will still have access to the feature.
- Right-click on Your Chosen File/Folder and Select Properties from the drop-down menu.
- Select the Advanced option
- Tick the Box next to Encrypt Contents to Secure Data and select OK.
- Choose Apply, and when prompted, pick whether you want all folders within that directory to be encrypted or merely the top-level one. When you’ve decided, select OK.
The process can take a while depending on the size and contents of the folder. So be patient as it can take a little long. The process will be worth the wait, though. After all, you will ensure a new level of security for your files due to the encrypted data. It is impenetrable to outside threats. Your folder and all of its data are now password-protected by your account. You won’t need to enter your password each time as long you’re signed to your account.
Alternative: Use 7-Zip to password-protect files
Unfortunately, the built-in feature is available only in Windows 10 Pro and Windows 11 Pro. If you’re running other versions you won’t have this feature. The alternative is to use the open-source free software 7zip to encrypt and password-protect files that you judge important.

For most users, adding a password to a folder will require a third-party archiving utility. 7-zip is a good option because it’s available for free and is open-source. It password-protects your more critical data. The only issue is that it works by compressing the folder. So whenever you need to access it, you will need to decompress the folder.
Encrypt/Compress Files with 7-Zip
- Navigate to the 7-Zip Download Page and select the right download for your settings. Nowadays, the option for most users is the 64-bit x64 Windows build. Once you’ve downloaded the file, install it as you would do with any other software and run it.
- Locate the Folder you Want to password-protect within the main 7-Zip interface. Select the Green addition sign in the application’s upper-left corner. Alternatively, drag and drop the folder anywhere within the main 7-Zip interface.
- Ignore the build of presets in the resulting pop-up window. Select Zip from the drop-down menu directly beside the Archive Format Option. This will keep the file compatible with computers without 7-Zip installed. Well, you can opt for a distinct file if you want to keep files dependent on a 7-Zip installation.
- Enter and Re-Enter your Password for the Folder in the Text Fields. Select OK when finished and allow the software to create a compressed, encrypted duplicate of the folder you wish to password-protect.
- Test the compressed file to ensure it is working fine. Once you know it is protected, delete the original folder so it can no longer be located. You don’t need two instances of the same data.
That’s it, you can move the compressed file and keep it stored anywhere you wish. You can move it to a USB Drive, or external SSD, or upload it to Google Drive or any other Cloud service. The file will be protected by a password, and only individuals with the password will be able to decompress and access your files.
How To Password Protect Files on MacOS
Like most versions of Windows, Apple’s macOS does not come with the password-protect feature natively. However, you can still make your files private through one of the software’s native features.
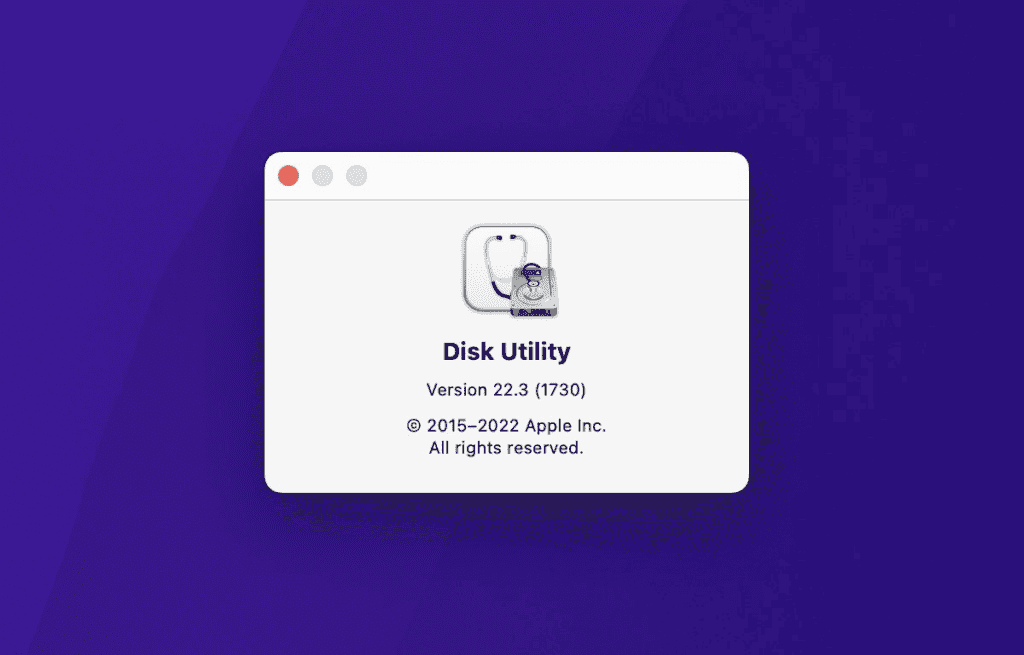
Adding a password will require you to create an encrypted disk image through the operating system’s native Disk Utility. It’s an app that comes pre-installed on nearly all Mac devices. Once it’s created you’ll be able to access the folder as a mounted virtual disk. It will allow you to edit, add, and delete content after entering a designated password. Any changes you make, while the disk is mounted, will automatically become both encrypted and password-protected upon dragging the disk to the Trash.
- From the Applications Folder, Select Disk Utility. Alternatively, use the Spotlight feature and search for the application.
- After you’ve opened the app, select File. Then choose New Image from the result, then select Image from the folder. Choose the file or folder you want to make private and select open.
- Once you’ve tagged and named the folder that needs protection, click Read/Write from the drop-down menu in Image Format. You will also see a drop-down menu under the Encryption tab. Choose 128-bit AES encryption which is a secure standard.
- Enter and Re-enter your Password in the Text Fields. Select Choose, then Save. Disk Utility will inform you when it has finished creating the image with password protection.
- To make sure you’ve done it correctly, open the image. You will get an instruction to put in a password. If you do so, enter the password and select OK.
- Put the Original Folder in your Trash and then empty your Trash Folder to prevent anyone from opening it.
Alternative: Hide Your Files or Use Cloud Storage
If you don’t want to go through creating a virtual password-protected image, you can try some alternative features like Hiding the folder or Cloud Storage.
- Hide the Folder: To hide a folder on Mac, highlight the folder and press Shift+ “.” (period) + CMD. Remember, malicious agents might be able to find the folders. Still, this is a way to keep the folders away from the eyes of users who use your computer.
- Cloud Storage: Cloud Storage services like Google Drive or Dropbox, will keep your files password-protected. After all, only users with the credentials will be able to access the files.
How to Password Protect Folders on Ubuntu
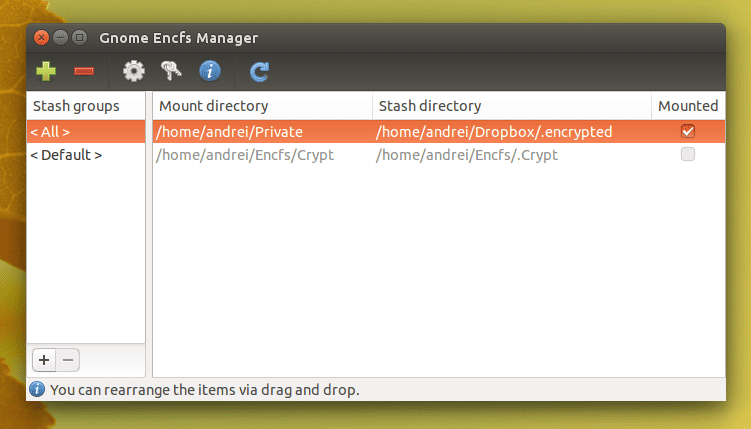
Password Protect Folders using GNOME EncFS Manager
GNOME EncFS Manager is a mounting app that lets you encrypt folders on Linux with ease. It’s supported by most Linux distros and has an intuitive GUI. It makes it easy even for newcomers in the Linux world. Here are the steps to use the GNOME EncFS Manager for encrypting a folder on Linux.
- Open the Apps Menu, search for GNOME EncFS, and launch it.
- Tap on the “+” (Plus) icon in the toolbar. In the dialog box that will open, select the second ratio button under Directory or Drive to Encrypt or Import select a folder. Make sure to create a new (empty) folder here. You will need to move over the contents of your original folder to this.
- Select an appropriate option for the mount directory.
- Under Password, enter the password you want to use to encrypt the folder twice.
- Hit Create to create an encrypted folder.
It is worth noting that the GNOME EncFS manager will now create an encrypted folder (called Stash) and mount it to your selected destination directory. Double-click on this mounted drive to access the contents of the folder inside. To unmount it, check off the checkbox. Or right-click the stash and select Unmount.
Encrypt a File Using GnuPG
One interesting alternative to Linux Ubuntu and other distros (Linux Distributions) is the ability to individually password-protect files. Therefore, you can protect individual files and make the password a requirement for opening that file. For this task, GNU PG is an interesting app that allows you to do so. GnuPG is accessible via the CLI. Here is what to do to encrypt a file:
- Open the Terminal
- Use the cd command and the ls command to navigate to the directory containing the file you want to password-protect.
- Once inside the directory, run the following command to encrypt your file:
gpg -c filename- When prompted to input a password, type in one that’s strong and easy to remember.
GnuPG will create an encrypted file with .gpg file extension in your current working directory. To access it, you’ll need to decrypt it. For this, run the following command, and insert the password when prompted. The command is:
gpg filename.gpg
Conclusion
As you can see it’s perfectly possible to keep your folders/files password-protected in most of the modern operating systems. Therefore, you can keep your data secure from malicious agents and even from those who want to simply see what you’re doing on your PC. As usual, one of the alternatives for keeping files protected is to move them to cloud services that you trust. Therefore, you will always need to put in your credentials to access uploaded files wherever you are.


