How to Take a Screenshot on Windows 11: 8 Simple Ways
How to's | GuidesFriday, 02 February 2024 at 04:47
Do you want to take a screenshot of your Windows 11 screen and save it? Whether you want to store important data for later use or share something intriguing with others, taking screenshots is a useful ability. We'll look at eight various methods in this post to capture a screenshot in Windows 11, ranging from straightforward keyboard shortcuts to integrated tools offered by the OS. You can start discovering how to snap priceless moments on your Windows 11 display now.
How to Take a Screenshot on Windows 11
Method 1: Using the Print Screen (PrtScn) Button
One simple and proven way to take a screenshot on a Windows computer is to use the Print Screen key. To use the Print Screen key to take a screenshot, follow these steps:
- Locate the Print Screen key on your keyboard. It is usually labelled "PrtScn" or "Print Scrn" and can be found in the top row, often alongside other function keys.
- Press the Print Screen key once to capture a screenshot of the entire screen.
- Open image editing software like Microsoft Paint or Photoshop, and press Ctrl + V to paste the captured screenshot.
- Save the image in your desired format (JPG, PNG, etc.) to any location on your computer.
You may easily capture the full screen by using the Print Screen key approach. But what if all you want to do is take a picture of a certain window or area of the screen? Let's investigate a few more approaches.
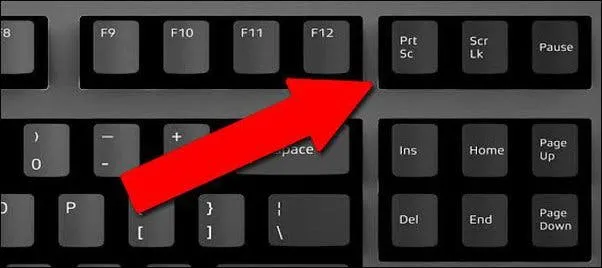
Image credits: Quora
Method 2: Using the Windows Key + Print Screen Key Combination
A handy shortcut in Windows 11 lets you take a screenshot and save it straight to your PC. To take a snapshot with the Windows key + Print Screen key combination, follow these steps:
- Press the Windows key (the key with the Windows logo) and the Print Screen key simultaneously.
- The screen will dim momentarily, indicating that the screenshot has been successfully taken.
- Navigate to the "Pictures" folder on your computer, where you will find a subfolder named "Screenshots." Open it to access your captured screenshot.
A simple and fast method to snap a screenshot is to press the Windows key and the Print Screen key simultaneously. To capture particular areas of the screen or even annotate the snapshot before storing it, there are additional choices available.
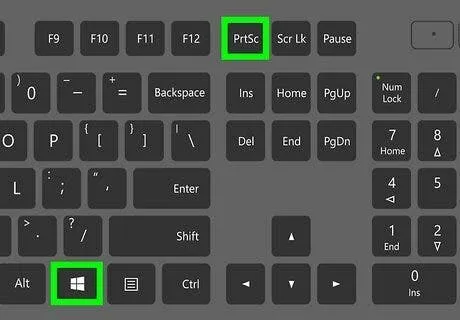
Image credit: wikiHow
Method 3: Using the Snipping Tool
Snipping Tool is a built-in feature of Windows 11 that lets you take screenshots of different sizes and shapes. Eventually, you can use the Snipping Tool by following these steps:
- Press the Windows key to open the Start menu.
- Type "Snipping Tool" and click on the app to launch it.
- Click on "New" within the Snipping Tool window.
- Select the desired snipping mode: "Rectangular Snip," "Freeform Snip," "Window Snip," or "Full-screen Snip."
- Use your cursor to select and capture the desired portion of the screen or window.
- The captured screenshot will open in the Snipping Tool editor, where you can annotate or make further modifications.
- Click on "File" and select "Save As" to save the screenshot to your desired location.
In situations where you need to take screenshots of specific areas of the screen or annotate them, the Snipping Tool offers greater versatility in screenshot capture. Snip & Sketch, a new and enhanced tool that offers even more capabilities and convenience, was released with Windows 11.

Method 4: Snip and Sketch
Introduced with Windows 11, Snip & Sketch is a multipurpose tool that combines the features of the Snipping Tool with the ability to annotate screenshots. However, to use Snip and Sketch to take screenshots, follow these steps:
- Press the Windows key + Shift + S to open the Snip & Sketch screen clipping toolbar.
- Click and drag your cursor to select the desired portion of the screen to capture.
- The captured screenshot will be automatically saved to the clipboard.
- A notification will appear in the bottom-right corner of your screen, allowing you to open the captured screenshot in Snip & Sketch for annotation.
- In Snip & Sketch, you can use various tools to draw, highlight, or add text to the captured screenshot.
- Once you are done, click on the floppy disc icon or press Ctrl + S to save the annotated screenshot.
In Windows 11, taking, marking, and saving screenshots is made easy and quick with the help of the Snip & Sketch tool. Undoubtedly, a lot of Windows users rely on it because of its strong feature set and easy-to-use design.

Additional Methods for Taking Screenshots in Windows 11
In addition to the previously listed methods, Windows 11 offers a few other screenshot-taking options to suit a variety of requirements and preferences:
- Alt + Print Screen: You may take a screenshot of just the active window by pressing the Alt key together with the Print Screen key.
- Windows Key + Shift + S: Identical to Snip & Sketch, this keyboard shortcut allows you to quickly grab a screenshot and save it to the clipboard.
- Game Bar: For gamers, Windows 11 has an inbuilt Game Bar function that lets you take screenshots while you're playing. To capture a screenshot, just click on the camera icon in the Game Bar after pressing the Windows key + G.
- Windows + Volume Down (on a tablet): You can take a screenshot by simultaneously hitting the Windows key and the Volume Down button if you're using a Windows 11 tablet or another device with a detachable keyboard.
You may select the Windows 11 screenshot technique that best fits your needs and tastes now that you are aware of the several approaches. With a variety of choices available in Windows 11, you may enhance the efficiency and enjoyment of taking screenshots, be it a straightforward full-screen capture or a detailed annotation of a specific region. So go ahead and use your Windows 11 screen to begin recording those unique moments right now!
Popular News


Latest News
Loading