A few years ago, using a Windows PC over a macOS system (or vice versa) was quite limited when we talk about crossover. For example, it was hard to split gadgets/files between these two platforms. This has quite eased in recent years, with both platforms offering more compatibility. Despite this, they are still very different in terms of functionality. If you need to use both platforms for, perhaps, working you will probably deal with the need to share files between these platforms. Using the same external drive with both Windows and macOS is possible, however, it could be challenging for the less experienced users. In this article, we will teach you how to share an external drive between Mac and Windows computers. (Via: DigitalTrends)
At first glance, using the same External Drive on both macOS and Windows computers can sound tricky for inexperienced users. However, it’s quite possible. You only need to partition the external drive to make it available for both OS. When you partition a hard drive, you’re splitting its internal storage space into different sections. These different sections can be formatted to work with multiple computers.
You can partition a hard drive using both Windows and macOS, through this article you will learn how to complete the process regardless of the OS you’re using.
First things to know
Upon a quick search on Google, you may believe that FAT32 is the best possible choice. It has been available for years, works with most of the external drives, and is usually the standard for some USB sticks. However, it has a massive limitation nowadays. It does not allow you to store individual files if they’re bigger than 4 GB. You can fill a 500 GB Hard Disk formatted in FAT 32, as long as all the files have up to 4 GB. To circumvent this issue, you can work with the Extensible File Allocation Table, or exFAT. It’s the natural replacement for FAT 32 works with much larger files and offers universal compatibility nowadays.
NTFS for Windows, MacOS Extended for Mac, and exFAT for both
NTFS may also sound like an interesting choice if you’re an experienced Windows user. The problem is that this can’t be read natively by macOS. So what you can do to use the same hard disk drive on both Windows and Mac computers? You’ll need at least two partitions, one in NTFS or MacOS Extended and another one in exFAT.
If you’ve been using the external drive on Windows for years, there are great chances it is already in NTFS. So to preserve your files you can simply create a secondary partition in exFAT for use with macOS computers.
If you’re starting from scratch, we suggest you format your Hard Drive in MacOS Extended if you use the Mac as the primary choice with a secondary exFAT partition. However, if you’re a Windows user most of the time, then go for NTFS + exFAT. This way, you will have one partition for use with the primary OS and a secondary one that can be read in both operating systems.
Be aware of the fact that formatting will delete all data stored on the drive. So make sure to back up anything important before beginning the formatting process
- Step 1: Right-click on the Start Menu and select Disk Management on the Power User Menu.
Usually, the external drives are formatted out of the box. However, if you encounter the “Not initialized” error when connected to the PC, it’s not formatted correctly to work with Windows. In some cases, it won’t even have an assigned drive letter in File Explore. Without a proper initialization, it won’t show space for allocating data.

If you see the Initialize Disk pop-up window, it will provide two formats: Master Boot Record (MBR) and GUID Partition Table (GPT). The former is old and supports capacities up to 2 TB. However, it is compatible with older versions of Windows. GPT is a newer format that supports larger capacities but is not compatible with older versions of Windows.
Select the Partition Style and Click OK To continue. If you accidentally close the pop-up, right-click on the listed disk and select Initialize Disk on the pop-up.
- Step 2: Once your disk is initialized Right-Click on the unallocated space, and select the New Simple Volume option in the pop-up menu.
- Step 3: The New Simple Volume Wizard begins, So Click on the Next Button.
- Step 4: Since we’re creating two partitions, divide the listed physical number in half. Type that number into the field next to Simple Volume Size in MB and click the Next Button to continue. Allow the Wizard to assign a drive letter, or manually assign the letter using the drop-down menu. Click the next button to proceed.
Now you need to select a file system. If your primary system is Windows 11, use NTFS. Also, enter a volume label (drive name) to avoid confusion. Click the next button to proceed.
- Step 5: Click the Finish Button to Complete.
In the Disk Management, the external disk will now list one new volume with your label. A Second Portion with unallocated space will appear. So let’s make it universally compatible with both Windows and macOS computers.
Right-click on the unallocated space and repeat Step 1 to Step 6. This time, however, choose exFAT as the file system during step 6. You’ll use it to share files with macOS. Note that you don’t need to specify a volume size this time around. After all, it will pick the unallocated space. Of course, if you plan to create multiple partitions, you can determine their size individually. Once you’re done, click on finish.
Partition of the External Drive in MacOS
Partitioning an external drive in macOS is not as problematic as in the past. Assuming that your external drive has no partitions, you will need to create two. You may also see the “initialize” error when the drive’s file system is not “Readable”. Click on the Initialize button on the small pop-up screen to create your first compatible partition and begin at step 5. If the error does not appear, then start following the instructions below:
How to Create macOS and exFAT Partition on MacOS Sonoma
- Step 1: With Finder, go to the Menu Bar followed by utilities on the Drop-Down menu.
- Step 2: Double-click the Disk Utility icon in the following window.
- Step 3: With the Disk Utility open, your drive appears under External located on the left. Click Erase, located on the app’s top toolbar, as shown below.
- In the next pop window, enter a name for your file. Select MacOS Extended (Journalist) as the format and GUID Partition Map as a scheme.
- Step 4: Click the Erase button to make these changes.
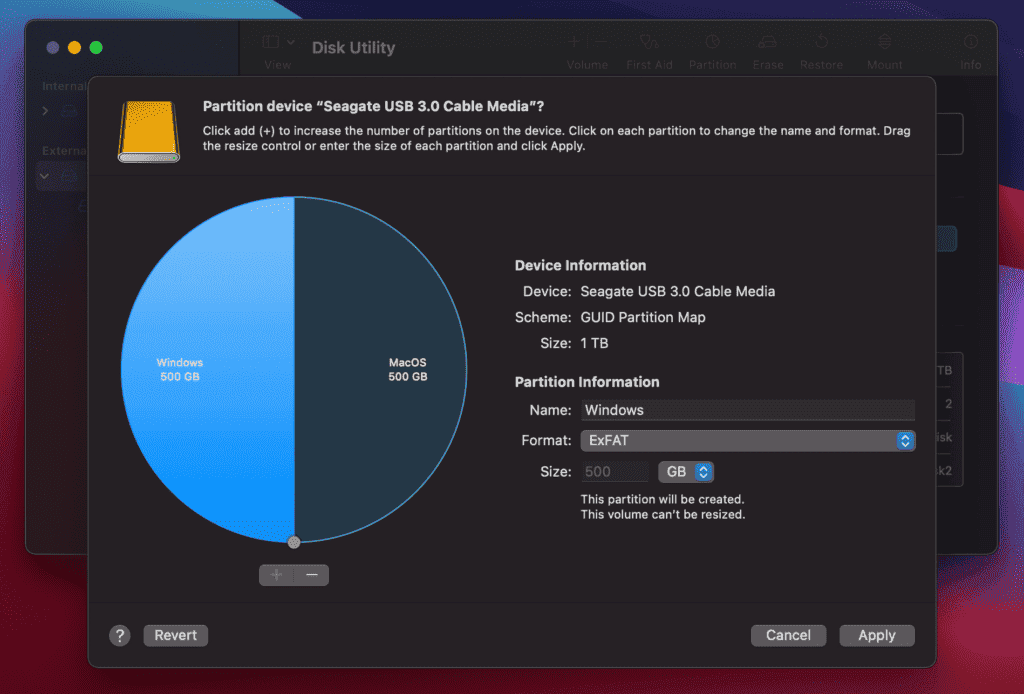
- Step 5: Once complete, your drive should have a single partition. Highlight the drive again in Disk Utility and then click Partition listed at the top instead.
- Step 6: On the following pop-up, click the small Plus button located under the blue pie chart to add a second partition.
- Step 7: A second portion appears, slicing the pie graph down to the middle. Enter a volume name and select the exFAT format. That portion will be shared between the two platforms.
- Step 8: Click the Apply button to add the new partition.
- Step 10: Click the Partition button in an additional pop-up window to complete the process.
- Step 11: Click the Done Button to Finish.
If you don’t need to manage files between the two platforms and just need an external drive that works in both, you can opt for a secondary partition with NTFS for Windows. This way, the external drive will work for both platforms, but you will never be able to file manage from each other.
Conclusion – Use External Drive on Both Windows and Mac
It’s perfectly possible to have an external drive working on both Windows and macOS computers. You just need to partition it and create partitions that will be compatible with each operating system. As we’ve said above, if you don’t plan to manage files on these different platforms, the best thing to do is to split the drive in macOS Extended and NTFS, or vice-versa. However, if you plan to do so you can use either an NTFS main partition for Windows or a macOS extension for Mac with a secondary exFAT partition.
There is even a third scenario: If your external drive has enough space, you can even play with the possibility of having three partitions. You can use NTFS, macOS Extended, and finally an exFAT partition for sharing files between the two platforms. This should be pretty possible in drives with more than 1 TB of Storage. However, you decide your needs and manage them accordingly.
Partitioning a hard drive isn’t a complicated deal, whether you’re using Windows or Mac. You can also use a paid application or free open-source apps. Multiple apps for Windows or Mac can help you to enable NTFS to read/write on Mac computers.