Don’t feel limited by the default screen resolution setting on your Windows, Mac, or Linux PC. Alongside numerous other customization options, these Operating Systems allow you to personalize your screen resolution. Adjusting this setting is simpler than you might imagine—it only requires a quick visit to your Settings app or Control Panel (depending on your OS) and a few clicks. Whether you’re using Windows 11, Windows 10, Windows 7, macOS, or Ubuntu, we’ll guide you through the process of customizing your screen resolution. (Via)
The Importance of Knowing How to Change Screen Resolution in Different Windows Versions
There are several scenarios in which a user might want to change the screen resolution on their Windows PC:
- Compatibility: Some applications or games may require specific screen resolutions to run optimally. Adjusting the resolution to match the requirements of the software can enhance compatibility and improve performance.
- Visibility: Users with visual impairments may find it beneficial to adjust the screen resolution to make text and graphics larger and easier to see. Conversely, users with high-resolution displays may prefer to increase the resolution for sharper image quality.
- Multitasking: Higher screen resolutions allow for more screen real estate, enabling users to view multiple windows or applications simultaneously without overlapping or crowding. This can enhance productivity and workflow efficiency.
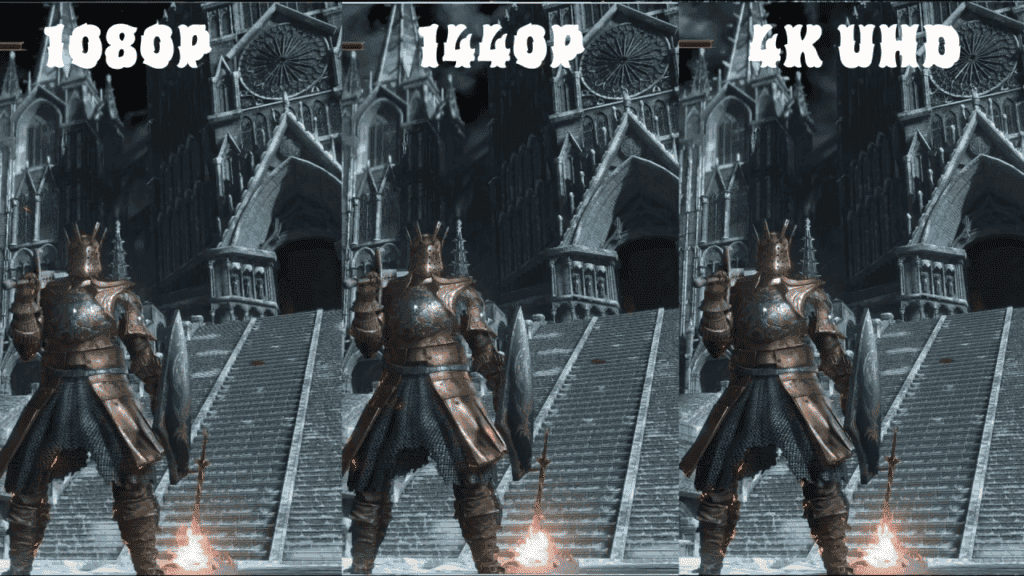
- Gaming and Multimedia: Gamers and multimedia enthusiasts often prefer higher resolutions for a more immersive experience with crisp, detailed graphics. Adjusting the resolution to match the capabilities of the monitor or display device can enhance the visual quality of games and multimedia content.
- Hardware Changes: Connecting a Windows PC to a new monitor or display device may require adjusting the screen resolution to ensure optimal compatibility and performance.
Knowing how to change the screen resolution in different Windows versions is essential for users to customize their computing experience according to their preferences and requirements. Each Windows version may have a slightly different interface or location for adjusting screen resolutions, so familiarity with the specific steps for Windows 11, Windows 10, or Windows 7 ensures users can easily make the necessary adjustments regardless of the operating system they’re using. This knowledge empowers users to optimize their display settings for the best possible experience, whether for work, entertainment, or accessibility purposes.
The process is simple, and we will tell you how to quickly do it in the most recent Windows Versions, macOS, and Ubuntu.
Windows 11:
Adjusting the screen resolution in Windows 11 is a straightforward process that can significantly enhance your computing experience. Here’s a detailed guide on how to do it:
- Step 1: Begin by opening the Windows 11 Settings app. You can do this by clicking on the Start button and selecting the Settings icon from the menu.
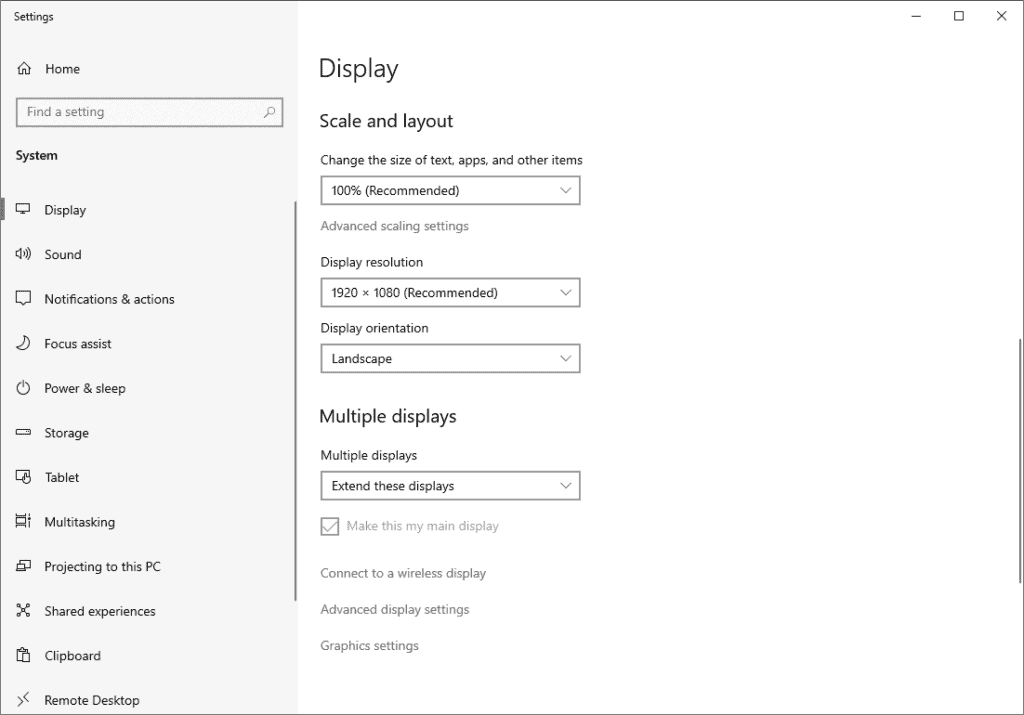
- Step 2: Within the Settings app, locate and click on the “Display” option. This will take you to the display settings page where you can customize various display-related preferences.
- Step 3: If you have multiple displays connected to your computer, you’ll see them listed as “1” or “2” under the “Displays” section. Click on the display for which you want to change the screen resolution. If you only have one display connected, you can skip this step and proceed to step 4.
- Step 4: In the “Scale and Layout” section of the display settings page, you’ll find the “Display Resolution” option. Click on it to access the available resolution options.
- Step 5: A list of supported resolutions for your display will appear. Choose the resolution that best suits your preferences and requirements from the available options. Keep in mind that higher resolutions offer sharper image quality, while lower resolutions may make text and graphics appear larger.
- Step 6: After selecting your desired resolution, click on the “Keep changes” button to apply the new resolution settings. Windows will adjust the screen resolution accordingly, and you’ll have the option to revert to your previous settings if needed.
By following these simple steps, you can easily adjust the screen resolution on your Windows 11 PC to customize your display settings and optimize your viewing experience for work, gaming, or multimedia activities.
Windows 10:
Adjusting the screen resolution in Windows 10 is essential for optimizing your display settings to suit your preferences and requirements. Here’s a comprehensive guide on how to do it:
- Step 1: To begin, navigate to the Windows 10 Settings app. You can access the Settings app by clicking on the Start button and selecting the gear-shaped Settings icon from the Start menu.
- Step 2: Within the Settings app, locate and click on the “System” option. This will take you to the system settings page, where you can customize various aspects of your Windows 10 system.
- Step 3: In the “System” settings page, click on the “Display” tab from the left-hand menu. This will bring up the display settings, allowing you to adjust various display-related preferences.
- Step 4: Scroll down to the “Scale and Layout” section of the display settings page. Here, you’ll find the “Display resolution” drop-down menu.
- Step 5: Click on the drop-down menu to view the available resolution options for your display. Windows 10 will automatically detect and display the supported resolutions for your monitor or display device.
- Step 6: Choose the resolution that best suits your needs and preferences from the list of available options. Higher resolutions offer sharper image quality, while lower resolutions may make text and graphics appear larger.
- Step 7: After selecting your desired resolution, click on the “Apply” button to apply the changes. Windows 10 will adjust the screen resolution accordingly, and you’ll have the option to revert to your previous settings if needed.
By following these straightforward steps, you can easily adjust the screen resolution on your Windows 10 PC to enhance your viewing experience for work, gaming, or multimedia activities. Understanding how to customize your display settings empowers you to tailor your Windows 10 experience to suit your unique needs and preferences.
Windows 7
Adjusting the screen resolution in Windows 7 is also simple. Of Course, the navigation is a bit different due to the OS’s older UI. Anyway, if you’re still familiar with one of the most popular OS from Microsoft you shouldn’t have any problem. Here’s a step-by-step guide on how to do it:
- Step 1: Start by accessing the Control Panel on your Windows 7 computer. You can do this by clicking on the Start button and selecting “Control Panel” from the menu.
- Step 2: Within the Control Panel, locate and click on the section labeled “Appearance and Personalization.” This section contains various settings related to the visual appearance of your computer.
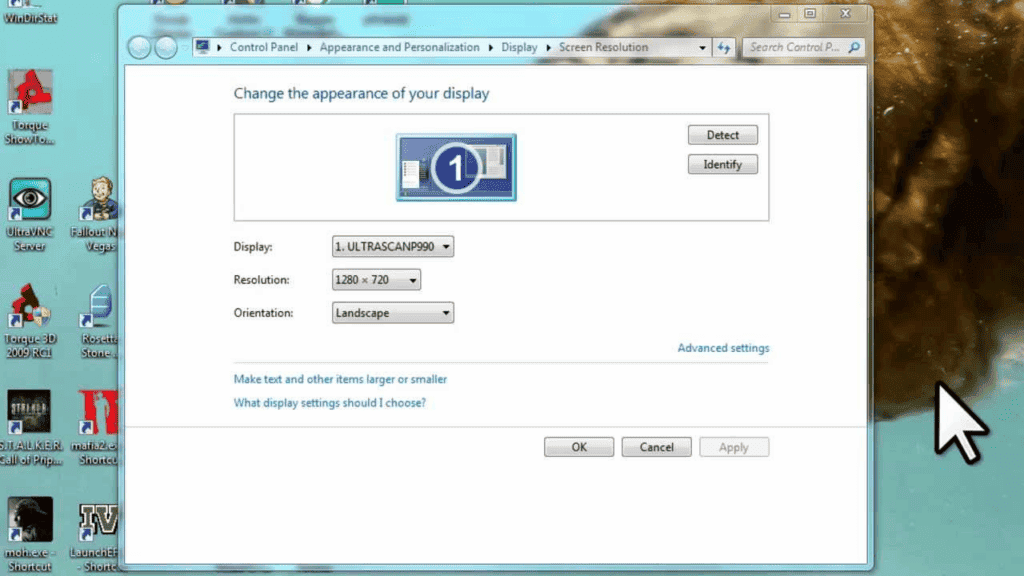
- Step 3: Within the “Appearance and Personalization” section, find and select the option labeled “Adjust Screen Resolution.” This will open the display settings window, where you can modify your screen resolution.
- Step 4: In the display settings window, you’ll see a drop-down menu labeled “Resolution.” Click on the drop-down menu to view the available resolution options for your display.
- Step 5: Once you’ve selected the desired resolution from the drop-down menu, you can fine-tune the settings by dragging the slider to adjust the resolution further if necessary.
- Step 6: After adjusting the resolution to your liking, click on the “Apply” button to apply the changes. Windows 7 will adjust the screen resolution accordingly.
- Step 7: To confirm your changes and keep the new resolution settings, click on the “Keep” button. If you decide to revert to the previous resolution, you can choose the “Revert” option.
By following these simple steps, you can easily adjust the screen resolution on your Windows 7 computer, allowing you to customize your display settings for optimal viewing comfort and clarity. Understanding how to navigate the control panel and adjust display settings empowers you to personalize your Windows 7 experience according to your preferences.
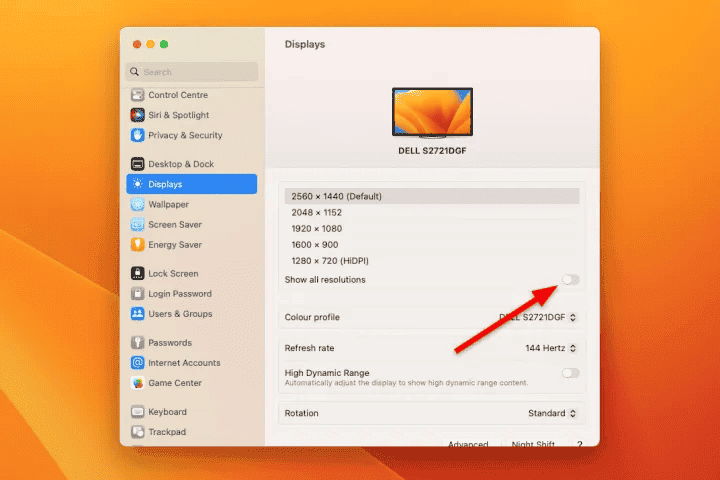
MacOS
The process of adjusting the screen resolution is also simple in macOS. Regardless of the version you’re using, the options will be fairly similar. It allows you to customize your display settings for optimal viewing comfort and clarity. Here’s how you can do it:
- Step 1: Click on the Apple logo in the top-left corner of your screen to open the Apple menu.
- Step 2: From the Apple menu, select “System Preferences.”
- Step 3: In the System Preferences window, click on the “Displays” icon. This will open the Displays preferences pane, where you can adjust your display settings.
- Step 4: In the Displays preferences pane, you’ll see a tab labeled “Display.” Click on this tab to access the display settings.
- Step 5: Within the Display tab, you’ll find the “Resolution” options. Click on the drop-down menu next to “Resolution” to view the available resolution options for your display.
- Step 6: Select the desired resolution from the drop-down menu. You can choose from various resolution options, depending on your display and monitor capabilities.
- Step 7: After selecting the desired resolution, close the Displays preferences pane. Your screen resolution will be adjusted automatically to the chosen setting.
By following these simple steps, you can easily adjust the screen resolution on your macOS device, allowing you to customize your display settings for optimal viewing comfort and clarity.
Ubuntu
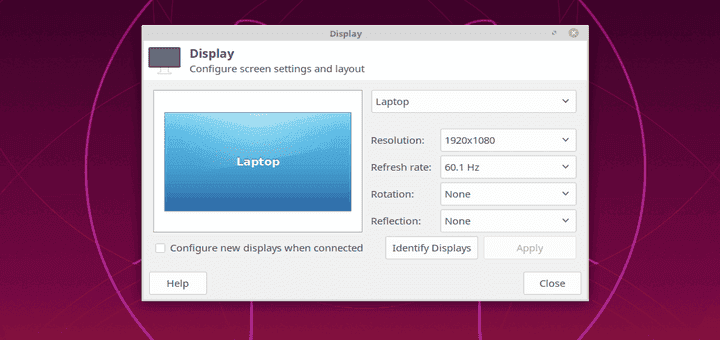
Linux is known for the multitude of distributions (Distros) available with different visuals and features. However, Ubuntu easily stands as one of the most popular distros among Linux fans. Therefore, we will help you to adjust the settings according to this popular environment.
- Step 1: Click on the system menu located in the top-right corner of your screen.
- Step 2: From the system menu, select “Settings.”
- Step 3: In the Settings window, click on the “Devices” option.
- Step 4: From the Devices menu, select “Displays.” This will open the Displays settings window.
- Step 5: In the Displays settings window, you’ll see a section labeled “Resolution.” Click on the drop-down menu next to “Resolution” to view the available resolution options for your display.
- Step 6: Select the desired resolution from the drop-down menu. You can choose from various resolution options, depending on your monitor’s capabilities.
- Step 7: After selecting the desired resolution, close the Displays settings window. Your screen resolution will be adjusted automatically to the chosen setting.
By following these simple steps, you can easily adjust the screen resolution on your Ubuntu system. It is worth noting that the principle will be the same for some Linux distributions, especially those that have the GNOME environment found within Ubuntu. Other popular distributions like Linux Mint will also have the option to adjust the screen resolution in a Settings Sub-Menu.


