There are a number of reasons that make a user switch to macOS or prefer it over Windows or Linux. Apple’s ecosystem offers unique apps and features that justify its loyal user base. Many users come from past experiences with Linux or Windows to find something that only Apple’s ecosystem can offer. One of the most notable characteristics of macOS is offering unique levels of interactions and customization for its users. The system is so complete and deep that many users never find its true potential through features that are hidden from the less trained eyes. If you’re a Mac user wishing to learn every bit about the OS, we’re providing a full list (Source) with 14 MacOS Tips to Improve your Overall Experience with the System. There are some interesting features that can be easily missed, and we will try to list the most in this article.
The below tips are valid for macOS Sonoma, but they can also work on previous macOS versions, assuming they’re not too old. So, without further ado let’s dive into the 14 MacOS Tips to Improve your Experience with the Operating System. With these tips you can make some processes easy, thus improving your productivity and saving you some time.
1. Open a Copy of a File by Default
The Stationery Pad improves your workflow if you regularly use document templates. The Finder feature tells a File’s parent application to open a copy of it by default, ensuring that the original file remains unedited. It’s an interesting feature if you want to make edits without changing the original file. Almost any type can be defined as a template with the Stationery Pad. It could be used to streamline common Photoshop jobs, create HTML/CSS files, or help with Word document invoicing.
To use it follow these steps:
- Right-click the File that You Want to use as a template. Select Get Info, then check the Stationery Pad Checkbox under the General Section. Lastly, click the Red Traffic Light button and close the Get Info Window. Next time you double-click the template file, Finder will automatically create and open a copy of it, keeping the original file’s integrity.
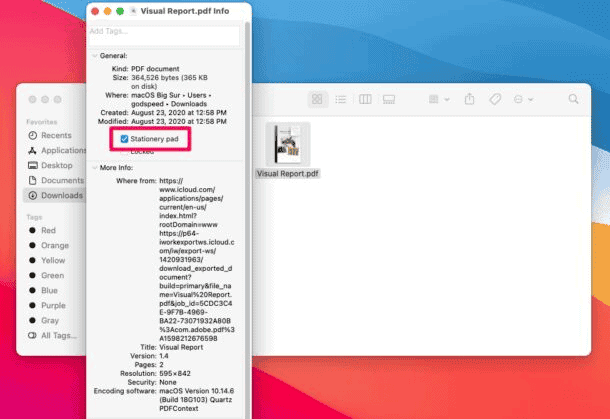
Although the Stationery Pad does not get the spotlight, it’s a useful feature. It’s a valid alternative to constantly editing templates and using the “Save As” command. This process can easily overwrite the original file if you’re not paying attention. So it’s nice to use the Stationery Pad to edit copies in a seamless manner.
2. Access More Preview File Format Options
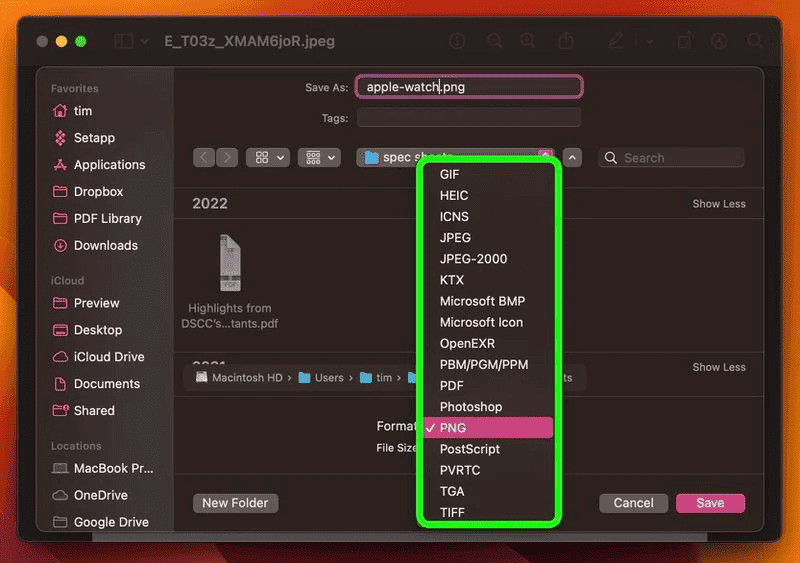
When you’re trying to save or export a file in Preview, You can Option-Click the Format Dropdown to get access to several additional file types. It’s a neat feature that allows you to quickly choose between various file formats.
3. Improve productivity with SnapBack Feature
Let’s say you go and search for a particular topic online on Safari’s address bar. The first link in the returned results appears to have your answer, so you click it. However, when you reach that website you’ve been sent to, you click on a related topic/link. In just a few minutes doing the same and same again, you’re completely lost. How to get back to the starting point?
The Safari Snapback feature can help. It saves you some time from clicking the previous page button multiple times to reach the original search results. You can find the feature in Safari’s menu bar, under History >> Search Results SnapBack. You can also use the Command-Option-S keyboard shortcut.
It is worth noting that SnapBack will only work for browsing history that happened in the same tab. If you click on a link and open it with a new tab, the SnapBack option will not be available. The search also needs to be performed from Safari’s address bar;
4. Tame the Hot Corners’ Behavior With Modifier Keys
In macOS, The Hot Corners feature turns each of the four corners of your screen into a designated action. It allows you to quickly access certain functions built into the system. For isntance, you can access the Mission Control, Notification Center, the Screen Saver, and More. The issue is that sometime you can accidentaly trigger the hot corner, when you don’t intend to. To avoid this, it’s possible to tame Hot Corner behavior using the modifier keys.
To use it, open the System Settings >> Desktop & Dock, scroll to the bottom of the menu, and click Hot Corners… In the dialog box that appears, click the Dropdown menu corresponding to the screen corner that you want to use as a Hot Corner. We are using the Shift + Command in our example. Now that is done, the next time you come to use a Hot Corner, hold down the modifier key(s) as you move the mouse cursor towards it. Otherwise the action you assdsigned to that corner won’t work.
5. Show More Recent Apps in the Dock
MacOS comes with a neat feature dubbed “Show Recent Apps in Dock”. It can be found in System Settings >> Desktop & Dock. It adds a dividre to the right-hand side of your Mac’s Dock. After it displays any apps you recently used that aren’t permanently docked. The option usually shows the three most recent apps. However, it is possible to make it show more apps.
If you have experience with pasting commands into Terminal, it’s possible to quickly increase or decrease the number of recently opened apps in Dock. Open a Terminal Window and paste the following at the command prompt and press Enter:
defaults write com.apple.dock show-recents -bool true;
defaults write com.apple.dock show-recent-count -int 10;
killall Dock
The -int argument defines the number of recently opened apps that you want to display in the Dock after the divider. You can change the number to suit. To revert back to defalt, you can simply change it to -int 3 in the second command.
6. Resize Windows From The Center
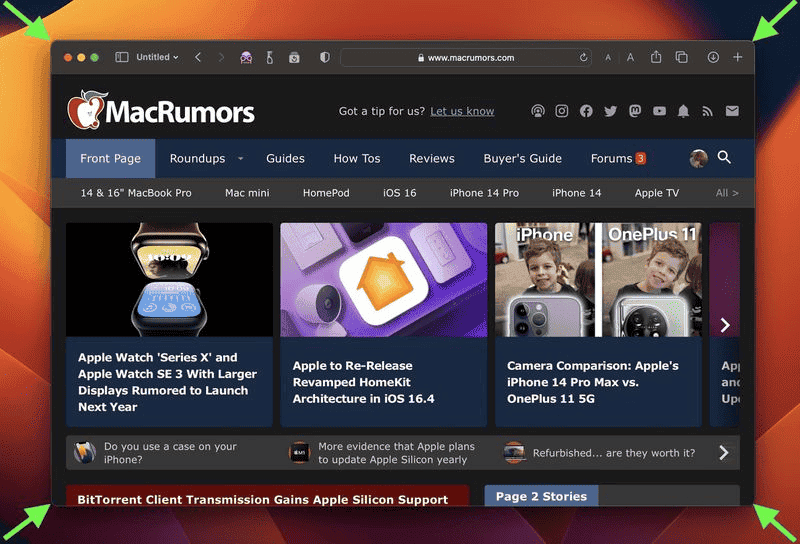
In MacOS, when you drag your mouse from one side or corner of a window to resize it. You can hold the Option key to resize the dimensions of the window from its center point instead.
7. How to Receive Unique Alerts for New Emails From VIPs
Apple Mail users can opt to receive notifications when you get new messages from your VIPs (Click Mail >> Settings in the menu bar) Click the General Tab and Select VIPs in the New Message Notifications Dropdown list. Setting up VIP alerts in this well can prevent your from receiving notifications for all other messages comimng into your inbox. A better sdolution is to set up a rule in Mail that plays a specific sound or bounces the Dock icon when a message pops out and the sender is in your VIP list.
In Mail’s Settings, Click the Rules Tab, then Click Add Rule. Give your rule a name in the Description Field, then for “If” choose any from the dropdown menu. For the first condition, select Sender is VIP. Next, under “Perform the following actions:” select Play Sound from the first dropdown. Then under the “Perform the Following Sections:” Choose a sound to play from the second dropdown. Finally, click “OK” then “Apply. With the new rule, you will get a unique alert for every VIP mail you receive. Therefore, it will be possible to distinguish from regular new message notifications as they come through.
8. Float Notes Over App Windows
In the Notes App in MacOS, it’s pretty possible to float individual notes over windows. Therefore, they will stay visible regardless of the applications that are active. It’s a convenient way to reference an existing note. You can keep it under your eyes while you’re doing other activities, writing an essay or report. It is also possible to take notes when researching something online.
To float a note in the Notes app, double-click the note to open it in a separate window. Select Windows >> Keep on Top from the menu bar. Just have in mind that floating notes can’t share the same scree as another app that is fullscreen mode.
9. Add App/File/Folder Shortcuts to Finder
It’s also possible to add app, file and folder shortcuts to the toolbar of Finder Windows. You only need to drag the item within the Finder window, then hold down the Command Key and Drop it onto an available space in the toolbar.
10. Quick Access to Specific System Settings
Mac or MacBooks that have a keyboard with icons printed on the function keys actually offer users with the possibility of performing special features. For instance, if they press teh F11/12 keys with speaker icons they can adjust the volume. If you hold down Option when you press one of these keys, the specific preferences in System Settings that are associated with the feature will open instantly. The Option F11/12 opens the Sound pane, for example.
11. Use the Dictate Feature
Well, if you’re too bored to write with the keyboard, you can use an interesting macOS Sonoma feature. With the new OS it’s possible to use keyboard input and Dictation at the same time. The ditacte feature is quite useful and you can use it without much issues. You only need to activate the Dictation shortcut which is assignable in System Settings >> Keyboard.
12. Automatically Close Safari Tabs
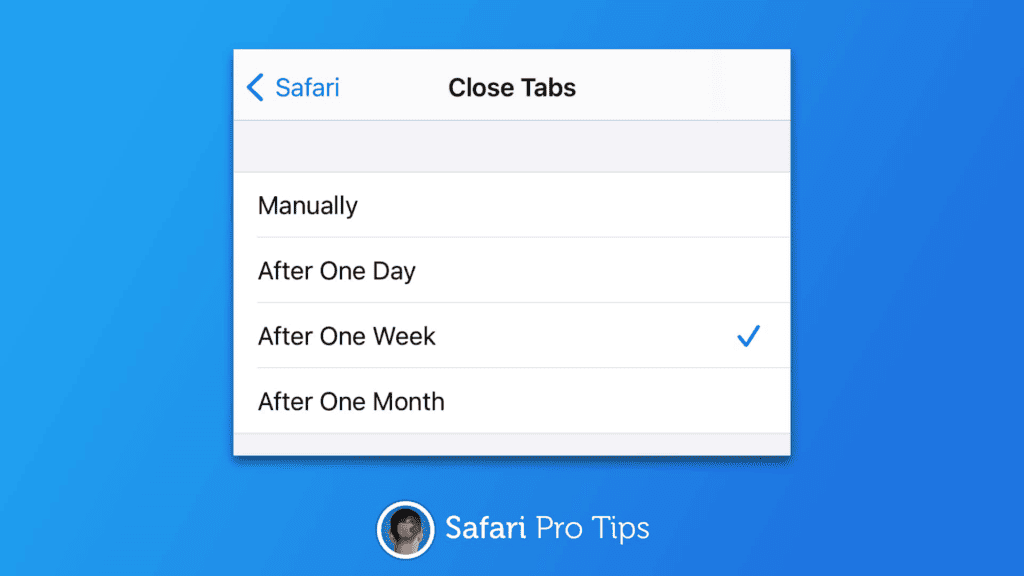
You can allow macOS to close Safari Tabs Automatically. The system will use as a parameter the last time you have viewed them. To enable it, Open Safari and Settings. Click in the Tabs Section. Next, to “Automatically Close tabs” you will find options to make the browser auto-close tabs that have not been viewed After One Day, One Week, and One Month.
13. Find Mail Attachment Downloads in Finder
In macOS Sonoma, when you download an email attachment from Mail and view it in Finder. The file includes a new mail symbol next to it to let you know it’s an email attachment.
In the Right-Click Context Menu, There is a “Reply to [Sender]” in the menu. When selected it will open the Mail compose window.
14. Share Photos Fast Via the iCloud Link
With macOS Sonoma, it’s possible to share photos and videos that are stored in the iCloud Photos via an iCloud link. You just need to generate the link. Select a Photo or Drag a Selection Box Over Several Photos. Then, click the Share Button, select Copy iCloud Link, and it will be copied to your clipboard ready for pasting in an email or message.
Conclusion
These Tips are very interesting to improve your experience with macOS. They can also be useful if you’re trying to find out the best offered by the latest macOS Sonoma update. If you’re a newcomer to macOS these tips are valid. However, some of these tips can be useful even for the most advanced users. So, take note of the above tips and start to extract the best of your operating system.
A special credit to MacRumors for Providing an Extensive List with Tips for MacOS Sonoma

