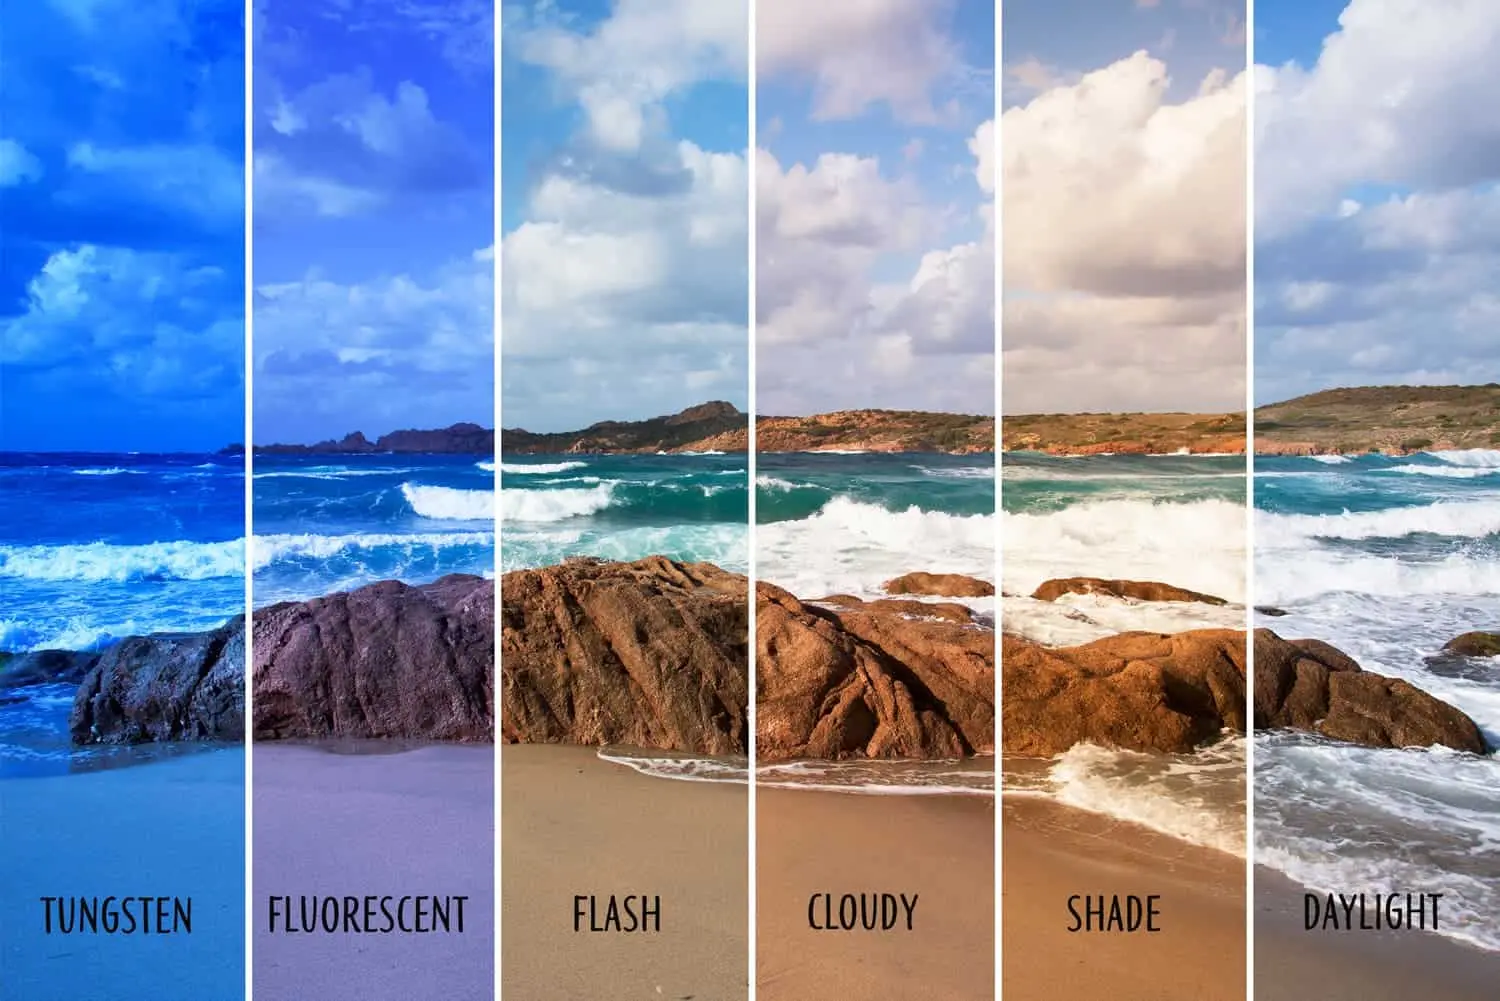
Whether it is a mobile phone or a camera, there is a "white balance", which is rarely taken care of when taking pictures. But this does not mean that white balance is useless, it is very useful. It can also help you capture great images. What is white balance, how should it be adjusted, and how does it help in taking pictures? In this article, we will explain in detail.

Preliminary understanding of white balance
White balance can be simply understood as restoring white to white. If there is a piece of white paper, the colour of the paper is supposed to be white. But under certain illumination, the colour changes. This is where the camera white balance comes in. It restores the paper's white colour to white. In some parts of this article, we will refer to White Balance as WB.

How white balance works?
We all know that the three primary colours of light are red, green, and blue. They can be mixed to produce various colours. There are 3 kinds of components on the camera, which sense blue, green, and red light respectively. Under the preset condition, the electronic amplification ratio of these three photosensitive circuits is the same, which is a relationship of 1:1:1. The principle of white balance is to change their magnification ratio. If the current ratio of blue, green, and red light is 2:1:1, then the WB will be changed to 1:2:2, and finally restored to white.
White balance and colour temperature
In physics, an absolutely black body is heated from absolute zero (-273°), and as the temperature increases, it will gradually emit red, yellow, white, and blue light. If the light emitted by bulb A has the same spectrum as the light emitted by an absolutely black body at 2000°, then the colour temperature of bulb A is 2000+273=2273K. When the colour temperature is very high, the colour is bluish. When the colour temperature is very low, the colour is reddish.

White balance is to compensate for colour casts. So WB and colour temperature are just opposite. When the white balance is low, the colour of the photos taken is bluish, and when the white balance is high, the colour of the photos taken is reddish.
Important conclusions
- White balance = ambient colour temperature, no colour cast.
- White balance > ambient colour temperature, reddish.
- White balance < ambient colour temperature, bluish.
Colour temperature and relative colour temperature
If you define the colour temperature according to the absolute black body, you will find that only red light, yellow light, white light, and blue light can be described. So what about green light and purple light? Due to the difference in the relative spectral power distribution, the coordinates of light cannot completely coincide with the trajectory of the absolute black body. So the closest absolute black body coordinates are used to represent the colour temperature, which is called "relative colour temperature".
For example, in the picture below, although the colours of point A and point B are different, their relative colour temperature is 10000K.

White balance offset
When adjusting the colour cast of white balance, in addition to finding the corresponding relative colour temperature, it is also necessary to know how far the real colour temperature is from the relative colour temperature, whether it is shifting toward green or toward magenta, and finally can make corresponding adjustments. When adjusting the WB in the retouching software, you can also see two options, one is called "colour temperature", which is used to change the relative colour temperature; the other is called "tint", which is used to change the offset part.

In the menu settings of SLR and mirrorless cameras, a "white balance offset" option is often provided, and you can manually adjust it after opening it. Different brands of cameras may have different names. If you want to research, you can look for it yourself. But I find this feature useless.
Various modes of white balance
AWB: This is automatic white balance, the acronym for automatic WB in English. The camera automatically adjusts. It is suitable for most cases where the colour cast is not serious.
Preset Modes: The camera also provides many presets based on the colour of common light, including cloudy, tungsten, and other modes. These can be used in any environment. But lighting manufacturers can ignore your set, so this mode is of little practical significance.
Manual Mode (K): Here you can manually change the white balance value. This doesn't make much practical sense either, since you can't change the offset colour.
Custom White Balance
Let's say under a warm yellow light, the scene is all yellow. However, the auto-white balance doesn't correct for the colour cast. Why? Because the adjustment degree of automatic white balance is limited. The camera does not know whether the yellow in front of you is a colour cast, or the scene itself is yellow. In case it was originally yellow and I made it white for you, you can't scold me.
At this time, we need to customize the WB. The principle is to "provide a white colour to the camera" and let the camera "adjust according to this standard".

How to customize white balance:
- Take Canon SLR as an example. In the same light environment, take a photo of pure white (white wall, white paper). Make sure that the white colour fills the whole picture.
- Then select Custom White Balance in the menu, and select the photo as the definition benchmark.
Special gameplay
The first is the problem of changing the colour of the photo to dim. I wanted to shoot a piece of bamboo, and faced with the green bamboo, the camera mistakenly thought that the light in the scene was green, and automatically cut the green, resulting in a dull photo.

Before WB adjustment - original image
After I manually customize the WB, and then shoot the bamboo, the color of the photo will not be too dull.

After WB adjustment
The professional mode needs to be turned on on the mobile phone. Taking a Huawei mobile phone as an example, you can first compose a view of a pure white object (don't take a picture), then press and hold AWB to lock the white balance, and then take a photo.
The second is to create a special colour cast effect. If I want a bluish photo, I can take a photo of a yellow (complementary colour of blue) object and use that photo to customize the WB. In order to turn yellow into white, the camera will automatically add blue, so the photos taken are all bluish.
Of course, you can also manually adjust the K value of the white balance directly, which is simpler. For example, when shooting a starry sky, it is usually black, but after adjustment, you can get a blue night sky.
Popular News

Latest News
Loading