How to Enable Blue Light Filter on Windows, MacOS and Ubuntu
How to's | GuidesThursday, 30 November 2023 at 20:24

We've been using PCs and smartphones for years, and their LED, LCD, TFT, or other displays that emit blue light are known for harming the eyes after a long period of usage. Recently, health companies started to aware users about the damage that can be caused by the extensive use of blue light. While companies are starting to adopt technologies that reduce the Blue Light, there are also some efforts made in the software to reduce in the strain. Modern smartphones have screen filters that reduce the blue lights, and the same happens with recent Operating Systems updates. Windows, Mac and Ubuntu aren't exceptions, and these OS latest iterations do come with blue light filter.
Windows 11 acknowledges the blue light issue after continuous use and provides a proper filter for your eyes. Instead of needing third-party tools, Microsoft now delivers the Blue Light Filter through its System Settings. The feature is called Night Light and is placed in the Display Section of System Settings just similar to its location on Windows 10. Through this article, we will guide you on how to enable the blue light filter in Windows 11. We will also teach you on how to enable the blue light filter on macOS Sonoma and the latest Ubuntu update.
How to Enable Blue Light Filter on Windows 11
If you spend hours a day starting at a computer screen like me, you will probably suffer from tension headaches and eye strain. Right now, there are some solutions like blue-blocking glasses or screen films, but modern operating system do come with their own internal solutions. Windows 11 is among them, and with a simple steps you can make your experience more confortable.

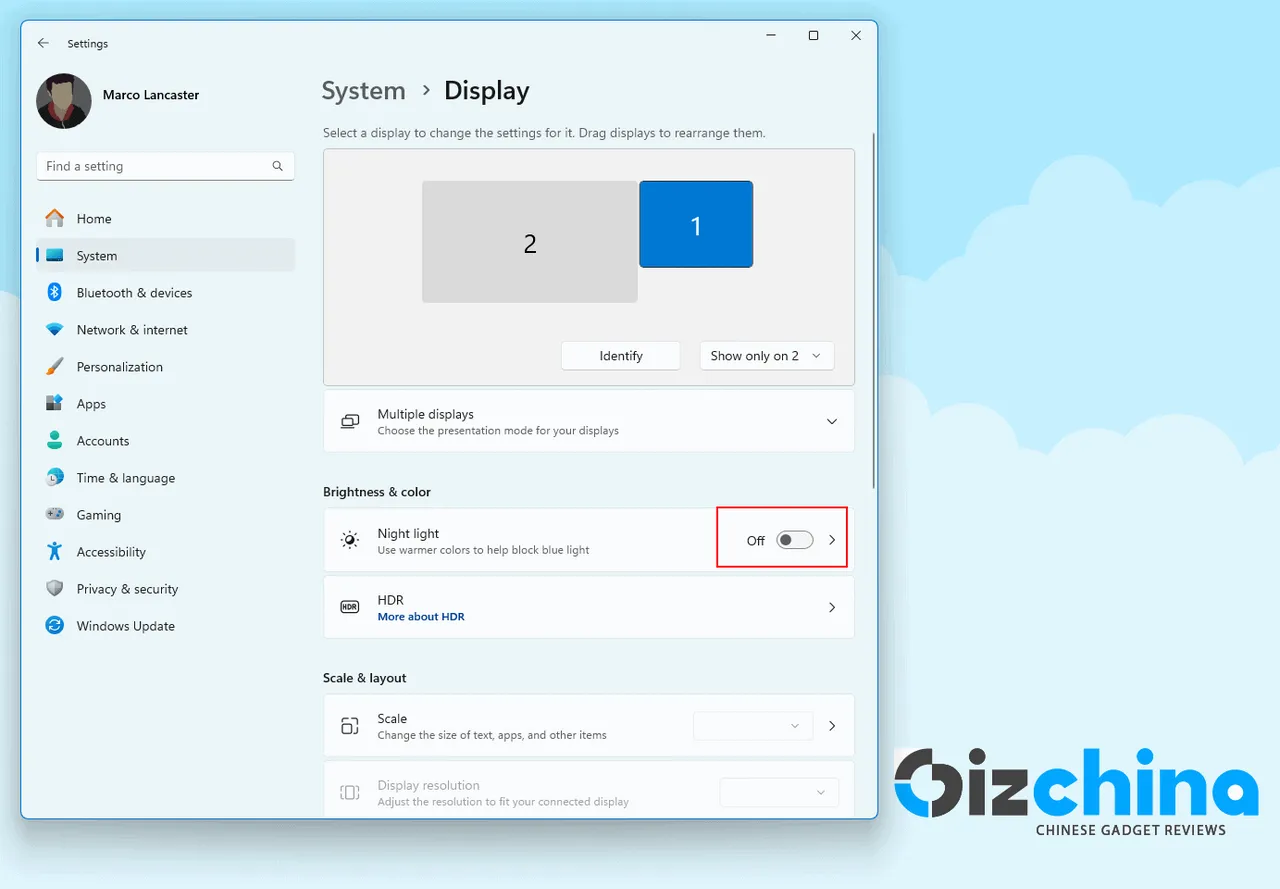
The first thing to do is to open the Settings app. You can do so by opening the notification center or by clicking in the Start Icon and clicking in the Settings Icon. This will open your Settings App, Navigate to the System Settings and select the Display sub-menu.

Here you need to turn the Toogle Switch On next to Night Light. Once you turn the switch On, the screen will shift to warmer colors.
Set Distinct Schedules on Windows 11
With the Toggle Enabled, the blue light filter will be turned on always. However, you can further customize this option adjusting the intensity and even setting up schedules for automatic use of the filter. Click on the Arrow next to the toggle.

You can customize the Blue Light Filter to be enabled by the Sunrise or set specific a specific hour to turn it on and off. The Intensity slider will allow you to decrease or increase the strenght and how warm the colors will be.
The process is quite simple with Windows 11 and don't need you installing third party solutions. Whenever you want to disable it you just need to make the same steps and turn the toggle off. Here is a quick summary of what you can do:
- With Windows 11 it's possible to enable a Night Filter to Reduce Blue Light via System >> Display >> Night Light.
- You can make the Blue Light Filter Always active letting the Toggle On.
- It's possible to adjust the intensity of the filter. You can choose anything from 0-100. At 100, your screen will be very orangish.
- You can set a schedule to activate the blue filter automatically. It's possible to set a starting time and an end time for the filter to be enabled. You can also set it to turn on with the "Sunset to Sunrise" option depending on your location.
It is worth noting that the same feature is also available on Windows 10.
How to Enable Blue Filter on macOS Sonoma
For macOS users it's also possible to reduce the strain to the eyes in the latest macOS Sonoma update. If you've just updated to macOS Sonoma and don't know exactly how to find the setting we will guide you through the needed steps. The Night Shift feature available in macOS was firstly introduced with iOS. However, Apple has implemented it in the macOS Sierra update in March 2017 and the feature has been available since then. Just like Windows, the feature is quite easy to enable and has the same level of versality.

Image Credit: CNET
Step 1: Click the Apple Logo in the top-left corner and select System Preferences of the drop-down menu. Alternatively, click the System Preferences icon on the Dock. In macOS Ventura and later, the feature is called System Settings.
Step 2: Select Displays In the pop-up window. On macOS Ventura and later, select Displays on the list of categories on the left.
Step 3: Click the Night Shift tab in the pop-up window.
From there, you can configure when the Night Shift Mode will run. You can adjust it to automatically run by the next sunrise. Moreover, it's possible to set your preferred color temperature. Similar to Windows, macOS allows you to schedule times for the feature to be enabled. It's possible to set a custom schedule.
The macOS Night Shift also makes your display's colors warmer and reduces the amount of emitted blue light. You can ajust it to improve your sleep habits and improve the health of your eyes.
How to Enable Blue Filter on Ubuntu
It would be hard to cover all the existing Linux distributions that offer Night Light filter. For that reason, we will stick with Ubuntu which stands as one of the most popular distros available. As you may expect, the free Linux-based Operating System does come with a Blue Night Filter which reduces the strain of your eyes and makes the colors warmer. The process is simple and if you're a novice in Linux don't worry, you won't need to perform countless terminal commands.
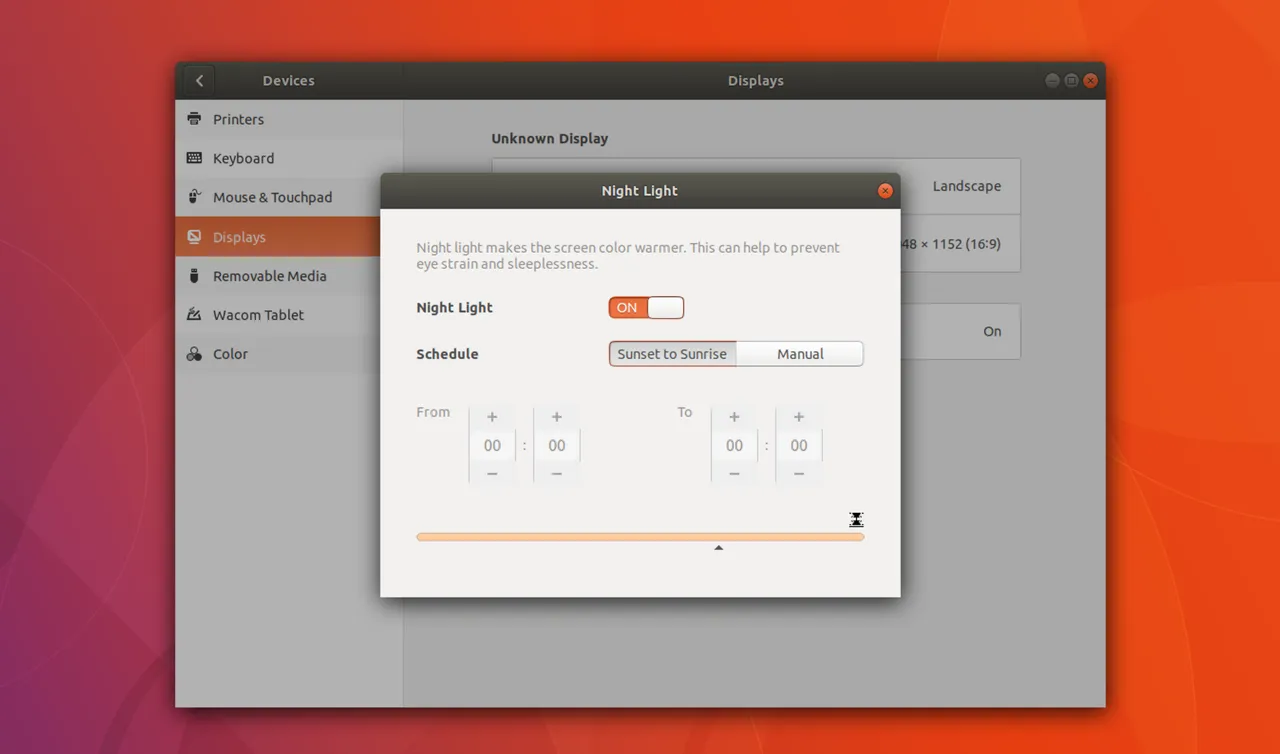
Image Credit: OMG Ubuntu
- Step 1 - Click on the Drop-Down Menu in the Top-Right Corner of Your Screen.
- Step 2 - Head to the Settings Icon.
- Step 3 - In the Settings Section, Select Displays and Switch to the Night Light Tab.
- Step 4 - Turn on the Night Light Filter.
Just like Windows and macOS, Ubuntu also allows you to further customize the use of Night Light Filter. You can set it to turn on from the sunset to sunrise depending on your location. Furthermore, it's perfectly possible to have it enabled and disabled from a start and end time. The same versatility found in the two previous Operating Systems is also present in Linux for this feature. Other Linux-based distributions may also include this feature with a similar behavior. It works similar to the previous solutions, it makes the color warmer in order to prevent the display from emitting blue light.
Conclusion - The Importance of Reducing your Exposure to Blue Light
According to health specialists via UC Davis Health the constant exposure to blue light over time could damage retinal cells and cause vision problems. These issues include age-related macular degeneration, but it also contribute to cataracts, eye cancer and growths on the clear covering over the white part of the eye. For that reason, it's important to prevent the constant exposure if you're always at the front of PC or smartphone. The Blue Light Filter is a neat feature that improves your comfort after long hours of use. However, in the long-term it can also improve your eyes' health and reduce possible impacts in the future to the constant exposure. For that reason, regardless of your operating system, try to use this feature when possible.
Popular News

Latest News
Loading