We all have a lot of unwanted contacts on our phones including duplicate contacts. We wish we could get rid of them all but it is not an easy task on the iPhone. It is quite hectic and time consuming, so most people just let it be.
I don't think you truly want to let them be. If so, you would not be reading this article right now. I just came across an easy way to delete multiple contacts from your iPhone. And I would like to share with everyone who would like to get rid of multiple unwanted contacts.
If you have two or more iPhones, you may have the same chunk of unwanted contacts on them. This is because they may all be using the same icloud account. But this method will delete all unwanted contacts from all your iPhones at the same time. You don't need to perform the task on each phone.
In this simple step-by-step guide, I will show you how to delete multiple contacts from your iPhone. Before we begin, make sure you are closer to a desktop computer or a laptop. It does not matter whether it is a Mac or Windows computer. I will show you how to do it on both systems. You should also have the icloud details at hand and of course, an internet access on the desktop.
Steps To Delete Multiple Contacts From iPhone
1. Open any browser on your desktop computer. In the address bar of your browser, type-in icloud.com and press enter (or return on Mac). Input your icloud details to login to your icloud account.
2. may send a notification to your iPhone to confirm that you are the one trying to log in. Select 'allow' to display the six-digit code. Input the six-digit code in the space provided on the icloud website on your desktop computer.

3. A message may pop up on your desktop asking you if you want to trust this browser. If the desktop computer happens to be your personal computer, you can click on the 'trust' button. With this, there won't be any need to confirm two factor authentication the next time you try to login to your icloud account. Otherwise, just click on 'Don't Trust' if the desktop computer is not your personal computer.
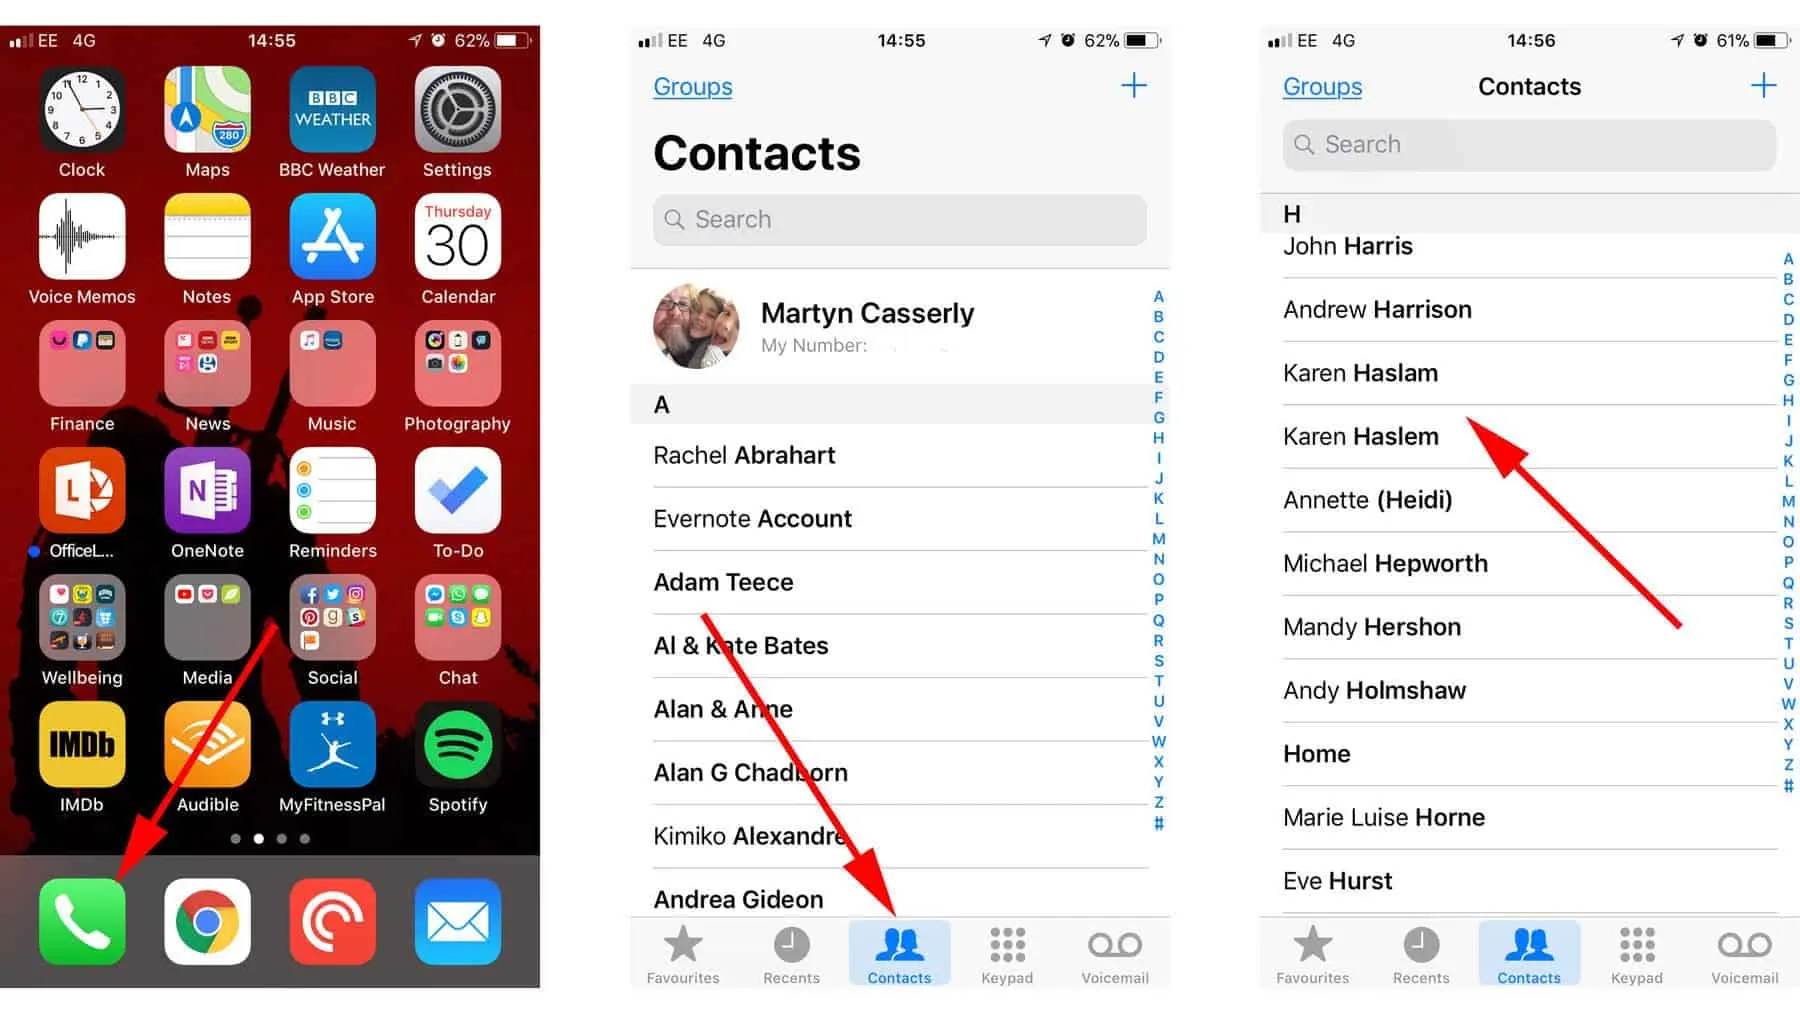
4. Now give it some few seconds for your icloud account front page to open. Ones it opens, you may click on the Contctcs icon.

5. Your contact list should show now. These contact should be the same contacts you have on your iPhone. This is where you can also delete all the contacts that you don't want from your iPhone. So we will go ahead a select all the unwanted contacts from here.
Let's Now Delete Multiple Contacts From Your iPhone
For Windows Computer: Press and hold the ctrl key on your keyboard and click on each contact that you would like to delete from your iPhone. If you also want to delete a lot of contacts that follow each other, you can press and hold the shift key on your keyboard.
While holding the shift key, click on the top contact first. Then scroll down till you get to the last contact that you want to delete. Click on the last contact. This will delete all the contacts in the highlight ones you click on the delete button.
On Mac Computer: On the Mac computer some keys are quite different from what we have on the Windows. So instead of ctrl you will press and hold the command key. Now click on each contact that you want to delete from your iPhone.
You can also press and hold thekey to highlight many contacts that follow each other. Just like we did for the Windows . Your selection should look similar to what we have below.

6. Ones all is set, you can select on the little settings icon on the button left corner of your screen. You will find the delete button, just click on delete. You can confirm your decision by clicking on the delete button ones again.
Instead on looking for the delete button, you can also press the Del key on your Windows PC or the Backspace key on your Mac.
That's it! All done. Your iPhone is now free from unwanted contacts.
Popular News


Latest News
Loading