
The latest KB5027303 update for Preview insiders has introduced a new privacy setting for Presence Sensing in the operating system. This feature has already been tested in previous insider flights, such as the KB5025299 update for the Beta channel in April and Build 25300 for the Dev channel in February. Now, developers that are testing the Windows 11 Build 25915 Canary Channel Preview Version now report the presence of the Presence Sensing option. On the OOBE (First Boot) page, you can choose to enable presence sensing on the privacy page.
Presence sensing, a feature recently introduced by Microsoft to Windows 11, can detect the presence of a user using various techniques such as computer vision or radar. The technology does the processing locally without transferring any image metadata to the sensor stack or the cloud. Relevant explanations are provided in the OOBE instructions as follows:
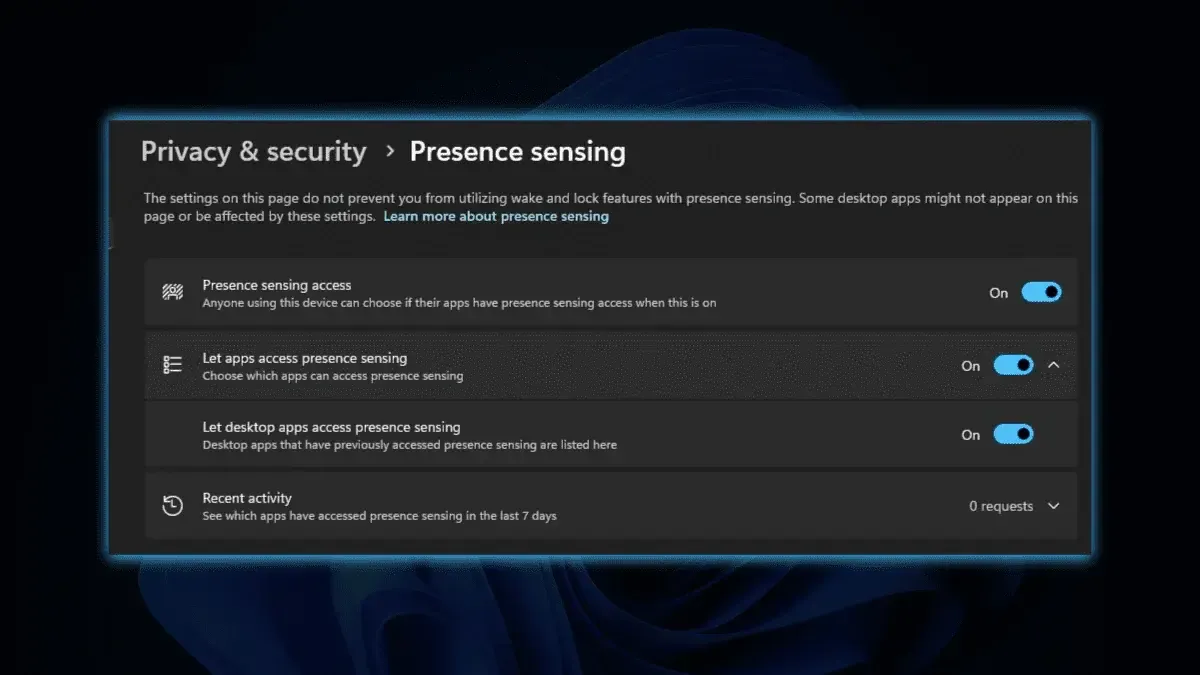
Windows can automatically turn off the screen when you leave and wake up the device when you approach. This feature enables apps to request access to your status for novel experiences. You can turn this off at any time in the settings.
Option 1
Users can use the ViveTool tool to enable the above new functions and features:
- Download the Vivetool tool from the GitHub page, and then extract it to any folder, but you need to remember the folder path (for example, C:\Program Files (x86)\ViVeTool-v0.3.2)
- Press the Win key (or use the mouse) to open the start menu, type "cmd", and then select "with administrator privileges" to open the command prompt
- Use the cd command to jump to the ViveTool folder, for example "cd C:\Program Files (x86)\ViVeTool-v0.3.2"
- Then enter vivetool /enable /id: 39484957 and press Enter
- Restart the computer
Option 2
To enable the Presence Sensing option in Windows 11, you can follow these steps:
- Open the Settings app on your Windows 11 device.
- Click on "Privacy & security".
- Click on the "Presence sensing" tab.
- Turn on the "Presence sensing access" toggle switch.
- Ensure that "Let apps access Presence Sensing" is also set to On.
- Locate the app you wish to allow access to your presence sensor and set that app to On as well.
- If you cannot locate the app, it's likely a desktop app. Desktop apps cannot be individually toggled, but access for those apps can be controlled as a group using "Let desktop apps access Presence Sensing".
It's worth noting that not all devices have a presence sensor, so you should check to see if your PC has the Presence Sensing settings. Also, the Presence Sensing option may appear during the Out-of-Box-Experience (OOBE) page when setting up a new Windows device.
Popular News


Latest News
Loading